


PropertySphere's intelligent Telegram bot
In the previous post, I introduced the PropertySphere sample application (you can also watch the video introducing it here). In this post, I want to go over how we build a Telegram bot for this application, so Renters can communicate with the application, check their status, raise issues, and even pay their bills.
I’m using Telegram here because the process of creating a new bot is trivial, the API is really fun to work with, and it takes very little effort.
Compare that to something like WhatsApp, where just the process for creating a bot is a PITA.
Without further ado, let’s look at what the Telegram bot looks like:
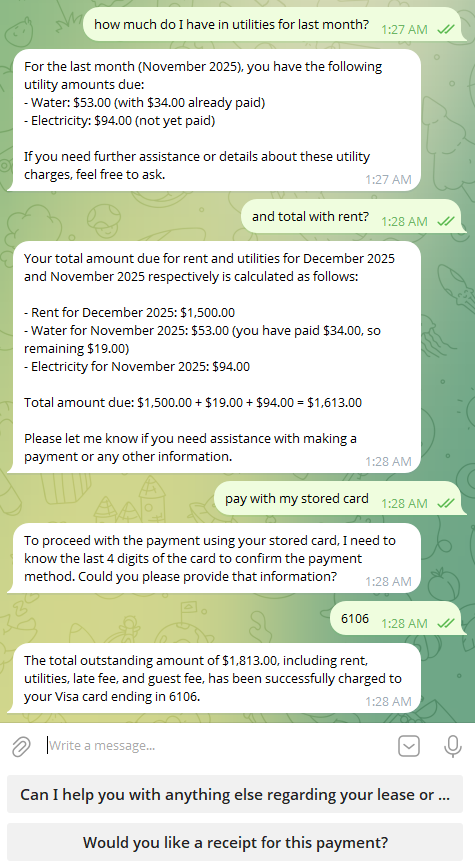
There are a bunch of interesting things that you can see in the screenshot. We communicate with the bot on the other end using natural text. There aren't a lot of screens / options that you have to go through, it is just natural mannerism.
The process is pretty streamlined from the perspective of the user. What does that look like from the implementation perspective? A lot of the time, that kind of interface involves… big amount of complexity in the backend.
Here is what I usually think when I consider those demos:

In our example, we can implement all of this in about 250 lines of code. The magic behind it is the fact that we can rely on RavenDB’s AI Agents feature to do most of the heavy lifting for us.
Inside RavenDB, this is defined as follows:

For this post, however, we’ll look at how we actually built this AI-powered Telegram bot. The full code is here if you want to browse through it.
What model is used here?
It’s worth mentioning that I’m not using anything fancy, the agent is using baseline
gpt-4.1-minifor the demo. There is no need for training or customization, the way we create the agent already takes care of that.
Here is the overall agent definition:
store.AI.CreateAgent(
    new AiAgentConfiguration
    {
        Name = "Property Assistant",
        Identifier = "property-agent",
        ConnectionStringName = "Property Management AI Model",
        SystemPrompt = """
            You are a property management assistant for renters.
            ... redacted ...
            Do NOT discuss non-property topics.
            """,
        Parameters = [
            // Visible to the model:
            new AiAgentParameter("currentDate",
"Current date in yyyy-MM-dd format"),
            // Agent scope only, not visible to the model directly
            new AiAgentParameter("renterId",
"Renter ID; answer only for this renter", sendToModel: false),
            new AiAgentParameter("renterUnits",
"List of unit IDs occupied by the renter", sendToModel: false),
        ],
        SampleObject = JsonConvert.SerializeObject(new Reply
        {
            Answer = "Detailed answer to query (markdown syntax)",
            Followups = ["Likely follow-ups"],
        }),
        // redacted
    });
The code above will create an agent with the given prompt. It turns out that a lot of work actually goes into that prompt to explain to the AI model exactly what its role is, what it is meant to do, etc.
I reproduced the entire prompt below so you can read it more easily, but take into account that you’ll likely tweak it a lot, and that it is usually much longer than what we have here (although what we have below is quite functional, as you can see from the screenshots).
The agent’s prompt
You are a property management assistant for renters.
Provide information about rent, utilities, debts, service requests, and property details.
Be professional, helpful, and responsive to renters’ needs.
You can answer in Markdown format. Make sure to use ticks (`) whenever you discuss identifiers.
Do not suggest actions that are not explicitly allowed by the tools available to you.
Do NOT discuss non-property topics. Answer only for the current renter.
When discussing amounts, always format them as currency with 2 decimal places.
The way RavenDB deals with AI Agents, we define two very important aspects of them. First, we have the parameters, which define the scope of the system. In this case, you can see that we pass the currentDate, as well as provide the renterId and renterUnits that this agent is going to deal with.
We expose the current date to the model, but not the renter ID or the units that define the scope (we’ll touch on that in a bit). The model needs the current date so it will understand when it is running and have context for things like “last month”. But we don’t need to give it the IDs, they have no meaning and are instead used to define the scope of a particular conversation with the model.
The sample object we use defines the structure of the reply that we require the model to give us. In this case, we want to get a textual message from the model in Markdown format, as well as a separate array of likely follow-ups that we can provide to the user.
In order to do its job, the agent needs to be able to access the system. RavenDB handles that by letting you define queries that the model can ask the agent to execute when it needs more information. Here are some of them:
Queries = [
    new AiAgentToolQuery
    {
        Name = "GetRenterInfo",
        Description = "Retrieve renter profile details",
        Query = "from Renters where id() = $renterId",
        ParametersSampleObject = "{}",
        Options = new AiAgentToolQueryOptions
        {
            AllowModelQueries = false,
            AddToInitialContext = true
        }
    },
     new AiAgentToolQuery
    {
        Name = "GetOutstandingDebts",
        Description = "Retrieve renter's outstanding debts (unpaid balances)",
        Query = """
            from index 'DebtItems/Outstanding'
            where RenterIds in ($renterId) and AmountOutstanding > 0
            order by DueDate asc
            limit 10
            """,
        ParametersSampleObject = "{}"
    },
    new AiAgentToolQuery
    {
        Name = "GetUtilityUsage",
        Description = """
Retrieve utility usage for renter's unit within a date
range (for calculating bills)
""",
        Query = """
            from 'Units'
            where id() in ($renterUnits)
            select
                timeseries(from 'Power'
between $startDate and $endDate
group by 1d
select sum()),
                timeseries(from 'Water'
between $startDate and $endDate
group by 1d
select sum())
            """,
        ParametersSampleObject =
"""
{
"startDate": "yyyy-MM-dd",
"endDate": "yyyy-MM-dd"
}
"""
    },
}]
The first query in the previous snippet, GetRenterInfo, is interesting. You can see that it is marked as: AllowModelQueries = false, AddToInitialContext = true. What does that mean?
It means that as part of creating a new conversation with the model, we are going to run the query to get all the renter’s details and add that to the initial context we send to the model. That allows us to provide the model with the information it will likely need upfront.
Note that we use the $renterId and $renterUnits parameters in the queries. While they aren’t exposed directly to the model, they affect what information the model can see. This is a good thing, since it means we place guardrails very early on. The model simply cannot see any information that is out of scope for it.
The model can ask for additional information when it needs to…
An important observation about the design of AI agents with RavenDB: note that we provided the model with a bunch of potential queries that it can run. GetRenterInfo is run at the beginning, since it gives us the initial context, but the rest are left for the judgment of the model.
The model can decide what queries it needs to run in order to answer the user’s questions, and it does so of its own accord. This decision means that once you have defined the set of queries and operations that the model can run, you are mostly done. The AI is smart enough to figure out what to do and then act according to your data.
Here is an example of what this looks like from the backend:
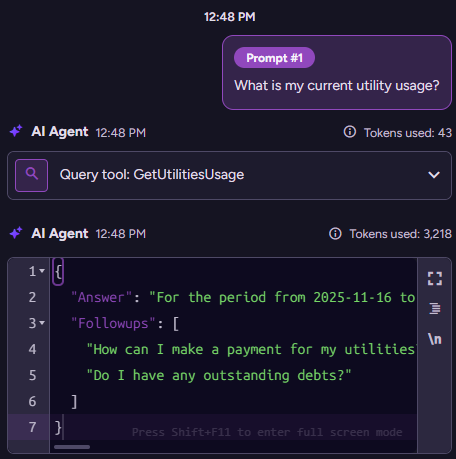
Here you can see that the user asked about their utilities, the model then ran the appropriate query and formulated an answer for the user.
The follow-ups UX pattern
You might have noticed that we asked the model for follow-up questions that the user may want to ask. This is a hidden way to guide the user toward the set of operations that the model supports.
The model will generate the follow-ups based on its own capabilities (queries and actions that it knows it can run), so this is a pretty simple way to “tell” that to the user without being obnoxious about it.
Let’s look at how things work when we actually use this to build the bot, then come back to the rest of the agent’s definition.
Plugging the model into Telegram
We looked at the agent’s definition so far - let’s see how we actually use that. The Telegram’s API is really nice, basically boiling down to:
_botClient = new TelegramBotClient(botSecretToken);
_botClient.StartReceiving(
    HandleUpdateAsync,
    HandleErrorAsync,
    new ReceiverOptions
    {
        AllowedUpdates = [
            UpdateType.Message,
            UpdateType.CallbackQuery
            ]
    },
    _cts.Token
);


async Task HandleUpdateAsync(ITelegramBotClient botClient,
Update update, CancellationToken cancellationToken)
{
    switch (update)
    {
        case { Message: { Text: { } messageText } message }:
            await ProcessMessageAsync(botClient,
message.Chat.Id.ToString(),
messageText,
cancellationToken);
            break;
    }
}
And then the Telegram API will call the HandleUpdateAsync method when there is a new message to the bot. Note that you may actually get multiple (concurrent messages), maybe from different chats, at the same time.
We’ll focus on the process message function, where we start by checking exactly who we are talking to:
async Task ProcessMessageAsync(ITelegramBotClient botClient,
string chatId, string messageText, CancellationToken cancellationToken)
{
    using var session = _documentStore.OpenAsyncSession();


    var renter = await session.Query<Renter>()
        .FirstOrDefaultAsync(r => r.TelegramChatId == chatId,
 cancellationToken);


    if (renter == null)
    {
        await botClient.SendMessage(chatId,
            "Sorry, your Telegram account is not linked to a renter profile.",
            cancellationToken: cancellationToken
        );
        return;
    }
    var conversationId = $"chats/{chatId}/{DateTime.Today:yyyy-MM-dd}";
    // more code in the next snippet
}
Telegram uses the term chat ID in their API, but it is what I would call the renter’s ID. When we register renters, we also record their Telegram chat ID, which means that when we get a message from a user, we can check whether they are a valid renter in our system. If not, we fail early and are done.
If they are, this is where things start to get interesting. Look at the conversation ID that we generated in the last line. RavenDB uses the notion of a conversation with the agent to hold state. The conversation we create here means that the bot will use the same conversation with the user for the same day.
Another way to do that would be to keep the same conversation ID open for the same user. Since RavenDB will automatically handle summarizing and trimming the conversation, either option is fine and mostly depends on your scenario.
The next stage is to create the actual conversation. To do that, we need to provide the model with the right context it is looking for:
var renterUnits = await session.Query<Lease>()
    .Where(l => l.RenterIds.Contains(renter.Id!))
    .Select(l => l.UnitId)
    .ToListAsync(cts);


var conversation = _documentStore.AI.Conversation("property-agent",
    conversationId,
    new AiConversationCreationOptions
    {
        Parameters = new Dictionary<string, object?>
        {
            ["renterId"] = renter.Id,
            ["renterUnits"] = renterUnits,
            ["currentDate"] = DateTime.Today.ToString("yyyy-MM-dd")
        }
    });
You can see that we pass the renter ID and the relevant units for the renter to the model. Those form the creation parameters for the conversation and cannot be changed. That is one of the reasons why you may want to have a different conversation per day, to get the updated values if they changed.
With that done, we can send the results back to the model and then to the user, like so:
var result = await conversation.RunAsync<PropertyAgent.Reply>(cts);


var replyMarkup = new ReplyKeyboardMarkup(result.Answer.Followups
    .Select(text => new KeyboardButton(text))
    .ToArray())
    {
        ResizeKeyboard = true,
        OneTimeKeyboard = true
    };


await botClient.SendMessage(
    chatId,
    result.Answer.Answer,
    replyMarkup: replyMarkup,
    cancellationToken: cts);
The RunAsync() method handles the entire interaction with the model, and most of the code is just dealing with the reply markup for Telegram.
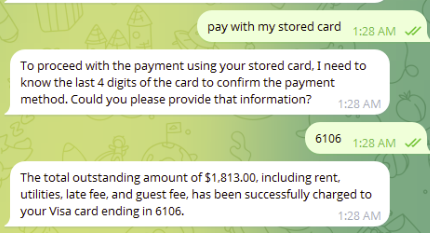
If you look closely at the chat screenshot above, you can see that we aren’t just asking the model questions, we get the bot to perform actions. For example, paying the rent. Here is what this looks like:
How does this work?
Paying the rent through the bot
When we looked at the agent, we saw that we exposed some queries that the agent can run. But that isn’t the complete picture, we also give the model the ability to run actions. Here is what this looks like from the agent’s definition side:
Actions = [
    new AiAgentToolAction
    {
        Name = "ChargeCard",
        Description = """
Record a payment for one or more outstanding debts. The
renter can pay multiple debt items in a single transaction.
Can pay using any stored card on file.
""",
        ParametersSampleObject = JsonConvert.SerializeObject(new ChargeCardArgs
        {
            DebtItemIds = ["debtitems/1-A", "debtitems/2-A"],
            PaymentMethod = "Card",
            Card = "Last 4 digits of the card"
        })
    }
]
The idea here is that we expose to the model the kinds of actions it can request, and we specify what parameters it should pass to them, etc. What we are not doing here is giving the model control over actually running any code or modifying any data.
Instead, when the model needs to charge a card, it will have to call your code and go through validation, business logic, and authorization. Here is what this looks like on the other side. When we create a conversation, we specify handlers for all the actions we need to take, like so:
conversation.Handle<PropertyAgent.ChargeCardArgs>("ChargeCard", async args =>
{
    using var paySession = _documentStore.OpenAsyncSession();


    var renterWithCard = await paySession.LoadAsync<Renter>(renter.Id!, cts);
    var card = renterWithCard?.CreditCards
.FirstOrDefault(c => c.Last4Digits == args.Card);


    if (card == null)
    {
        throw new InvalidOperationException(
$"Card ending in {args.Card} not found in your profile.");
    }


    var totalPaid = await PaymentService.CreatePaymentForDebtsWithCardAsync(
        paySession,
        renter.Id!,
        args.DebtItemIds,
        card,
        args.PaymentMethod,
        cts);


    return $"Charged {totalPaid:C2} to {card.Type}" +
    $" ending in {card.Last4Digits}.";
});
Note that we do some basic validation, then we call the CreatePaymentForDebtsWithCardAsync()method to perform the actual operation. It is also fun that we can just return a message string to give the model an idea about what the result of the action is.
Inside CreatePaymentForDebtsWithCardAsync(),we also verify that the debts we are asked to pay are associated with the current renter; we may have to apply additional logic, etc. The concept is that we assume the model is not to be trusted, so we need to carefully validate the input and use our code to verify that everything is fine.
Summary
This post has gone on for quite a while, so I think we’ll stop here. As a reminder, the PropertySphere sample application code is available. And if you are one of those who prefer videos to text, you can watch the video here.
In the next post, I’m going to show you how we can make the bot even smarter by adding visual recognition to the mix.
Comments
Comment preview